Welcome, welcome. Hope you are having fun on the bento bandwagon.


So far we have gone over what you need to make a bento and tips on how to make it stress-free. Now, my young grasshoppers, you are ready to make the leap and pack your kids a lunch.
Let's go with a typical American lunch, PB&J. If you can't do PB for allergies, try cream cheese. It's delicious, promise

You need, your box (I will show you how to pack a typical square plastic container if you don't have one) sandwich stuff, fruit, cheese to top the sandwich (if you choose), veggies, and some snacks
I like to make my sandwich before I cut because I find it to be neater (and I can eat the crusts). You will need to wiggle and pound the cutter until you are 105% sure it has gone through the entire sandwich. Then life the cutter up and hopefully your creation will plop right out. If it doesn't, gently work the sandwich out of the cutter using the back of a spoon. If you poke and prod, you will likely ruin it with divots.

Wiggle

Pound

Plop
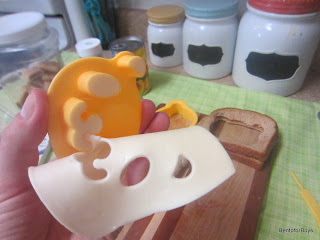
Now we gotta make that cute cheese topping, I used the cat deco cutter, that was about $5 and came with a cool pick to pop the pieces out. Same process as the bread. Wiggle, pound, remove.
After you cut you cheese gently peal it from the back of the cutter. If you didn't pound hard enough, or you didn't break all the way through the cheese, you will break it.

Be gentle!

Cut around your face to make it beautiful
The hard part is over, really. Making a cute sandwich really is the hardest part of bento making.
We need to put this masterpiece in the main compartment of our box with some extras around it. Like so. I added a little heart to the cookies, just because I could.

The muffin bar wasn't working out so I used veggie straws instead
Now we have to do that cucumber. You could just peel and slice it or cut it into shapes, whichever. I made little bears to go with the panda sandwich. When cutting juicy fruits/veggies do not remove the cutter and try to pop the shape out. It will turn into a gooey and sticky mess. Push the cutter all the way through to the bottom and then lift the whole fruit piece up and push completely through.

That first cut turned into a disaster

PUSH!!!
Lastly, we have the peaches, I placed one slice on the bottom of a silicone cup and then made two on top look nice and organized. For some extra fun I like to sprinkle some nonparallels on top. They run like crazy so don't do this the night before or your kids will have some funky coloured fruit.

You did it! You made a bento! Woot.
This should be more than enough food to fill up your child and an easy lunchbox (they have free shipping on amazon!!)

Pretty!
If you have a regular plastic container it should look something like this. But I can not say how well the peach juice will be contained in this one. The seal on the easy lunchbox is pretty rockin', these are kinda "meh" but will work in a non-drippy pinch.

BAM!
How's it feel to be a pro? Pretty amazing right? With a lunch like this, you are sure to be the coolest mom ever


