Showing posts with label tutorial. Show all posts

Sunday, July 21, 2013

Octopus Hot Dogs!


Since it's Monday madness, I basically make all the cute stuff I want and hope it works in a lunch . And this week I wanted to do something cute with hot dogs. 
Enter the octopus hot dog. Super easy to make, you just need to time it right because they take a hot minute to cook. I like to cut them and let them cook while I am making the bento fillers and then doing the dishes. Makes me feel like less time is wasted 

I used my new Goodbyn box from Target and decided to go nuts. A really wanted a hot dog and I really wanted to make a soot sprite sandwich. We both won. He also got some applesauce and left over birthday cake in the 2 cup container. In the main is the hot dogs with ketchup to dip, grilled cheese sandwich, heart cucumbers, and mandarin oranges.


See that grilled cheese? Totally used all the cheese scraps that have been accumulating in my fridge. 
See? Leftover as it's finest. Lil A got the scraps from cutting the sandwich for his lunch. Double score

Now, on to hotdogs. 

You will need
- Hot dog(s)
- Sharp knife
- Pot of boiling water

First, you are going to cut the hot dog in thirds. You could also do halves. Whichever

Then, take your ends and cut them about 2/3 of the way up into fourths. Confused? Me too. Here's a picture. 
This is what we are going for

Then, you are going to cut each section again. You can either cut from the bottom or the top. I like going from the top better. When I cut from underneath one of mine had 9 cuts. No clue how that happened 
Over 
Under 

Now that the cutting is done, we have to cook the hot dogs so the legs curl and look cute. 
You can do this in 3 ways. 
You can pan fry them - with or without water
Boil them in a deep pot
Deep fry them in hot oil - This works best for me, but I don't have a deep fryer anymore ;(
 Pan with water - takes FOREVER 
Boiling in a deep pan. Takes about 5 - 7 minutes 

So when your hot dogs are done, they should look something like this, or even a little better. 
I took the middle of the hot dog and cut it into slices to lift the pretty ones up in his lunch. 

I was in a rush to get them done so I only boiled them for about 3 minutes. We had a date with the horsedog and our backyard this afternoon. 

Go conquer the octopus hot dog and see how amazed your kids are. 

 Lil A hanging out in the backyard
Big A hanging out with the horsedog that we were watching this weekend! 

Friday, July 19, 2013

Apples, this months fun accessory

So let's have some fun with apples. Why? Well, they are cheep and most kids eat them like they are going out of style. Mostly they are cheep, and cheep and nutritious is a win in my book!

Imagine it's almost time to go and you have this gaping hole in your bento box and are frantically searching your cabinets for something to use. Along comes this cute checkered apple. Saved my life a few times.


See how the apple fits perfectly? It's like divine bento intervention!
Let's make this sucker.

*side note, I am left handed and extremely uncoordinated. Like, I'm usually not allowed sharp things so please forgive my crazy slanted cuts. 

You need

Cutting board
Apple - I only had teeny tiny ones
Pairing knife


 Cut that apple from the core.
 I feed the core to my dog, but you can do whatever with it. OR you can save it for a apple bunny. Yeah, I went there. Stay tuned for that awesomeness

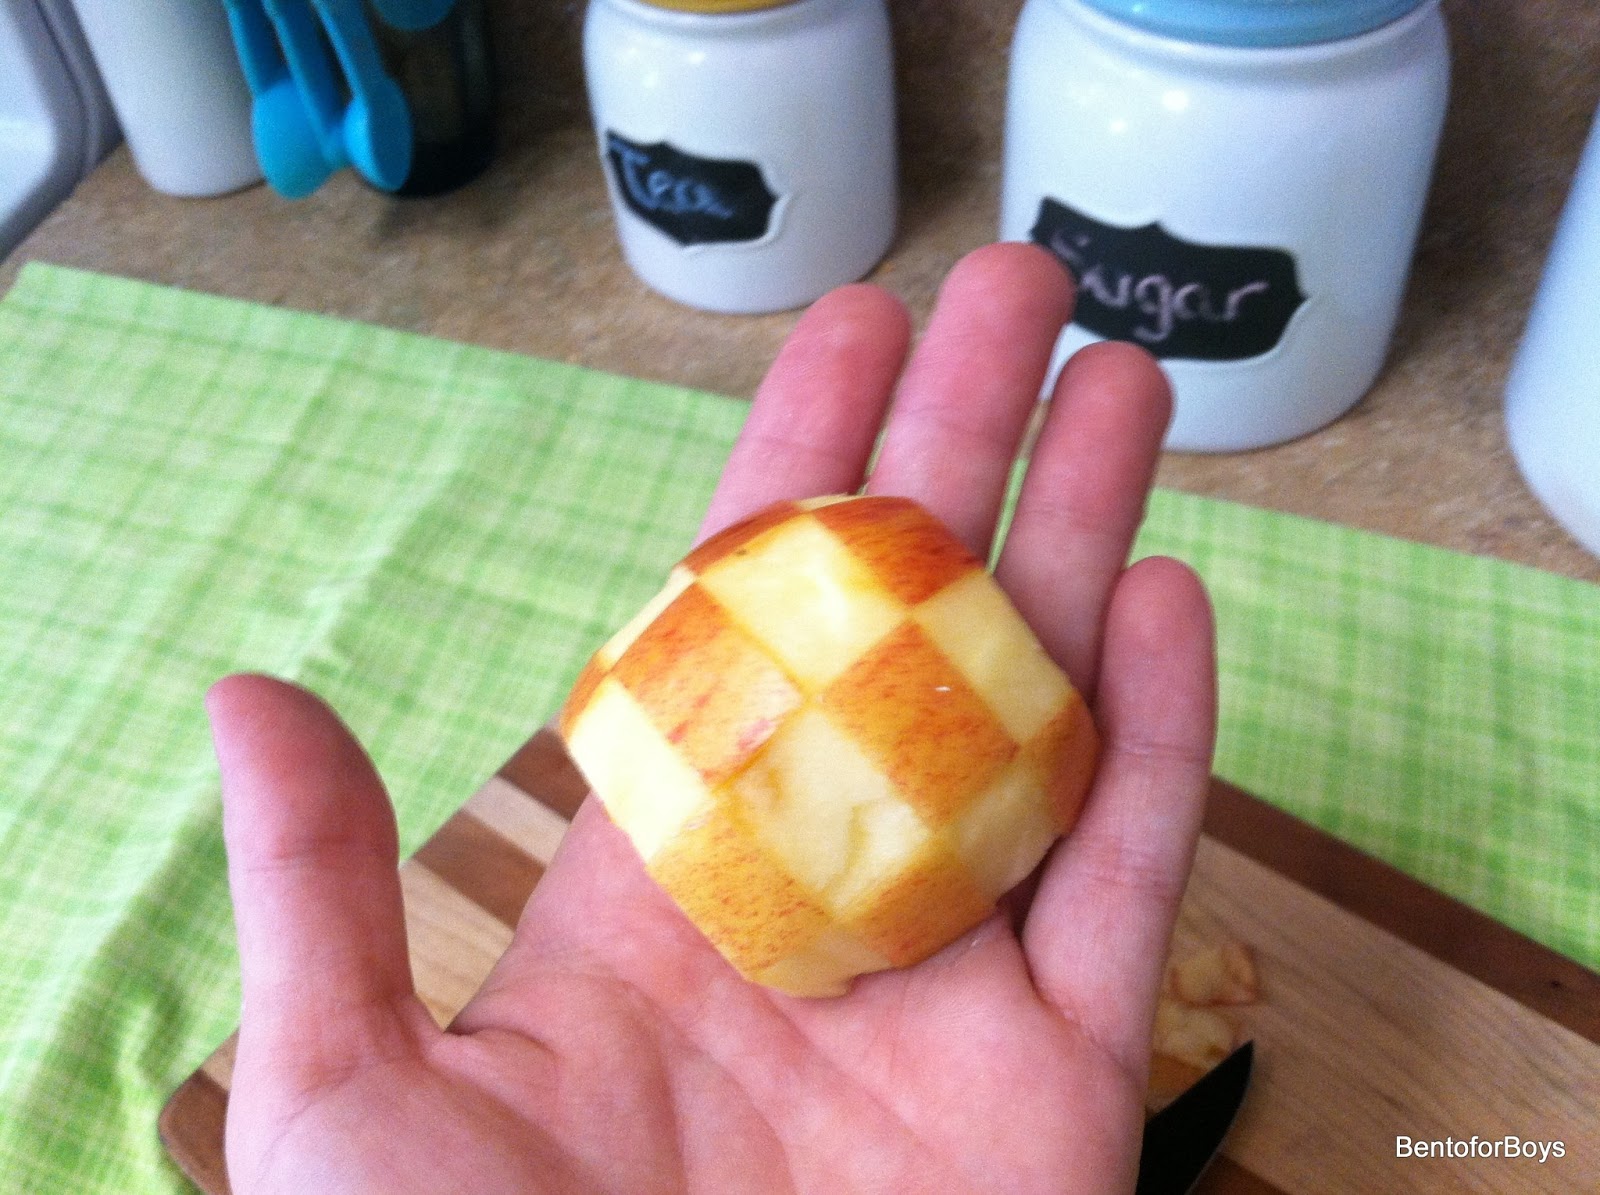
Then you want to score the apple in a checkerboard patters. Don't get all chop crazy and cut it, SCORE, like 1/8 of an inch deep. This is another trust me moment. You can make them as close or far apart as you want.
*the farther apart the less work. SCORE!


You can see that right? I hope so, it was insanely difficult to take a picture of. 

Try to make the cuts evenly spaced. I am straight line challenged, doubt my kids care so I roll with it. 

Now the tedious part, it gets easier every time, peel alternate pieces of peel off with the knife. BE CAREFUL. trust me. There is a reason I have a supply of thousands of band-aids right next it me. 


Don't worry about being perfect, you can clean it up later. Let's just get this done and over with. Oh wait, that'a my mantra. 

So it's all checkerboarded. Clean up the cuts and I like to cut the bottom/tops off to make it look neater 
By this time the dog has gone nuts with tail wagging and begging

Plop them in some cold water with a few drops of lemon juice to prevent browning. RINSE after and DONE! 


That wasn't too painful was it? 


Wanna do a bunny? Yeah, I'm not so hot at them bc I lack basic skills, but the kids like these even more. Here we go!

Take the left over sides and cut them from the core, or use the other half of the already cut apple.
If you use a half of an apple cut it in half vertically, like below


Then you can slice a bit off the bottom to make it stable and less risky to your fingers.
To make the ears, SCORE a V half way up the apple.
 I couldn't get a great picture of the V, but hopefully you get the idea.

 Then you are going to start at the wide part of the V and peel with your knife until the V ends. Does that make sense? I hope so. Try to slice as thin as possible or the ears won't flop up like they should. You can always clean up the ears later. I totally do.

You should be left with something that looks like the picture below. The V is gone and the points are free from the apple. Got it? Good.


Toss that baby in some ICE WATER with lemon for 5 minutes or so until the ears start to fold up.
If they don't fold up, you have too much apple flesh on the skin so carefully trust me peel some off until they pop up.


BAM apple rabbit! I had a lovely side picture by my kids deleted it. Sorry. They apparently love technology and that trash button is mighty tempting.

There you have it, two awesome things to do with apples that will liven any lunch box!


Thursday, July 18, 2013

A non-sandwich sandwich bento

After 4.5 days of school your kids are probably already sick of eating sandwiches and you are probably sick of making them. Why not revamp your idea of what a sandwich is and make sandwich sushi for their lunch!
How cute is that?! 

It's pretty easy to make and you don't need anything special to make them. 
You need - 
- Bread 
- Sandwich fillings
- A knife to take off crusts 
- A rolling pin to flatten the bread 
* I have totally had to use a can of veggies before bc my rolling pin was MIA 

Assemble the minions  supplies!!!
Totally forgot the cheese, don't judge me

Now the fun part, cutting off the crust and smashing the bread. It's a fantastic stress reliever ;) 


See how the one is all smashed? That's what we are going for

Once you are all smashed and crustless (Save them) assemble the sandwich! 

If you find you have too many toppings when you roll them just rip the excess off and call it a snack! 
Roll that sucker up good, but no too tight or your sushi will look all flat, and cut each slice of bread into 4 pieces 

If you find they are falling apart like mine are, use a condiment as a glue, like mustard, mayo, or PB.
When you are pack these loveys in a bento just make sure they are tight together and separation shouldn't be an issue. 
Making just a sit at home lunch is totally possible too, just arrange them on a plate to they don't loose their middles. 
See? Not perfect, but they were inhaled in about 38 seconds

That my friends, is sandwich sushi in a nutshell. 

Oh, pro tip? Watch out for cheese thieves 


Wednesday, July 17, 2013

Actually making a lunch

Welcome, welcome. Hope you are having fun on the bento bandwagon.
So far we have gone over what you need to make a bento and tips on how to make it stress-free. Now, my young grasshoppers, you are ready to make the leap and pack your kids a lunch.

Let's go with a typical American lunch, PB&J. If you can't do PB for allergies, try cream cheese. It's delicious, promise

You need, your box (I will show you how to pack a typical square plastic container if you don't have one) sandwich stuff, fruit, cheese to top the sandwich (if you choose), veggies, and some snacks

I like to make my sandwich before I cut because I find it to be neater (and I can eat the crusts). You will need to wiggle and pound the cutter until you are 105% sure it has gone through the entire sandwich. Then life the cutter up and hopefully your creation will plop right out. If it doesn't, gently work the sandwich out of the cutter using the back of a spoon. If you poke and prod, you will likely ruin it with divots.
 Wiggle
 Pound
Plop

Now we gotta make that cute cheese topping, I used the cat deco cutter, that was about $5 and came with a cool pick to pop the pieces out. Same process as  the bread. Wiggle, pound, remove. 
After you cut you cheese gently peal it from the back of the cutter. If you didn't pound hard enough, or you didn't break all the way through the cheese, you will break it. 


Be gentle! 
Cut around your face to make it beautiful

The hard part is over, really. Making a cute sandwich really is the hardest part of bento making. 
We need to put this masterpiece in the main compartment of our box with some extras around it. Like so. I added a little heart to the cookies, just because I could. 
The muffin bar wasn't working out so I used veggie straws instead

Now we have to do that cucumber. You could just peel and slice it or cut it into shapes, whichever. I made little bears to go with the panda sandwich. When cutting juicy fruits/veggies do not remove the cutter and try to pop the shape out. It will turn into a gooey and sticky mess. Push the cutter all the way through to the bottom and then lift the whole fruit piece up and push completely through. 

 
That first cut turned into a disaster
PUSH!!!

Lastly, we have the peaches, I placed one slice on the bottom of a silicone cup and then made two on top look nice and organized. For some extra fun I like to sprinkle some nonparallels on top. They run like crazy so don't do this the night before or your kids will have some funky coloured fruit.

You did it! You made a bento! Woot. 
This should be more than enough food to fill up your child and an easy lunchbox (they have free shipping on amazon!!) 

Pretty! 

If you have a regular plastic container it should look something like this. But I can not say how well the peach juice will be contained in this one. The seal on the easy lunchbox is pretty rockin', these are kinda "meh" but will work in a non-drippy pinch. 

BAM!
How's it feel to be a pro? Pretty amazing right? With a lunch like this, you are sure to be the coolest mom ever